


Introduction
As a CA(Certificate Authority), Let’s Encrypt provides free and automatic TLS/SSL certificates, which enables encrypted HTTPS for SRS Droplet. It’s very easy to use, only by 1-Click.
HTTPS is required for publishing streams using WebRTC, and it improves security. If you want to support the video streaming in any HTTPS website, such as a WordPress website, you must use HLS/FLV/WebRTC with HTTPS, or it will fail for security reasons.
Note that SRS droplet only supports a single domain name, which makes the problem simple. It is easy to use.
In this tutorial, you will learn how to configure the HTTPS for SRS droplets, and your certificate will be renewed automatically.
Prerequisites
To complete this guide, you will need:
- A SRS Droplet with Cloud SRS installed, please follow this set-up a video streaming service tutorial.
- A fully registered domain name, you could purchase a domain name on Namecheap or GoDaddy. For the demonstration purpose, however, we will use a placeholder
your_domain_namethroughout this tutorial.
This guide will also use placeholders your_public_ipv4 and your_domain_name throughout. Please replace them with your own IP address and domain name.
Step 1 – DNS Records Setup
Make sure setup a DNS record for your server. Please add an A record with your_domain_name pointing to your server public IP address, which is your_public_ipv4 as we mentioned, see Domains and DNS. Add a record like this:
A your_domain_name your_public_ipv4
To check the domain name, your status should look like this:
ping your_domain_name
Output
PING ossrs.io (your_public_ipv4): 56 data bytes
64 bytes from your_public_ipv4: icmp_seq=0 ttl=64 time=11.828 ms
64 bytes from your_public_ipv4: icmp_seq=1 ttl=64 time=16.553 ms
64 bytes from your_public_ipv4: icmp_seq=2 ttl=64 time=12.433 ms
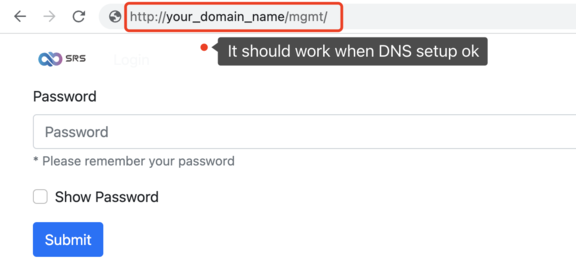
If you visit http://your_domain_name/mgmt, you should see the SRS Cloud console now.
Next, let’s fetch our certificates.
Step 2 – Obtaining an SSL Certificate
Now please switch to System > HTTPS > Let's Encrypt and enter your_domain_name, then click Submit button to request a free SSL cert from Let’s Encrypt:
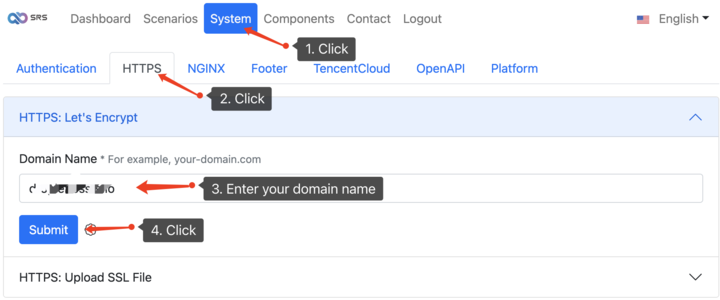
This runs certbot to fetch an SSL certificate. It will communicate with the Let’s Encrypt server, then create a challenge to verify that you control the domain that you’re requesting a certificate for. All these are automatically done by Cloud SRS.
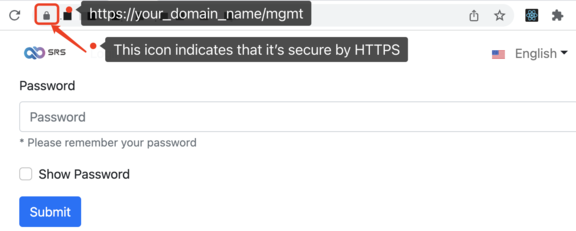
If successful, please try reload your website using https://your_domain_name/mgmt. Pay attention to your browser’s security indicator, as demonstrated bellow:
Note: You could request multiple domains separated by semicolon, after adding an A record for each domain, for example,
domain.com;www.domain.com, then bothhttps://domain.comandhttps://www.domain.comare available.
Let’s finish this tutorial by covering the certificate renewal process.
Step 3 – About Certificate Auto-Renewal
Let’s Encrypt’s certificates are only valid for about 3 months. SRS Cloud will start a timer to verify if it is due to renew your certificates on a daily basis, and reload Nginx to apply the changes if neccessary.
You can check the renew log by:
docker logs platform |grep renew
Output
Thread #crontab: auto renew the Let's Encrypt ssl
Thread #crontab: renew ssl updated=false, message is
Processing /etc/letsencrypt/renewal/lh.ossrs.net.conf
Certificate not yet due for renewal
The following certificates are not due for renewal yet:
No renewals were attempted.
If no errors, you’re all set.
Conclusion
In this tutorial, you set-up the DNS A Record, downloaded SSL Certificates for your domain, configured Nginx to apply the certificate, and set-up automatic renewal. If you have further questions, please contact us by discord.